Contents
Flooding can lead to rapid mold growth, which poses serious health risks and damages your home. It’s crucial to act quickly and methodically to mitigate these issues. By following expert guidelines, you can effectively manage mold remediation after flooding. But what steps should you prioritize to ensure a thorough and safe process? Discover the critical actions you need to take to protect your environment and well-being.
Key Takeaways
- Act quickly to remove standing water using wet vacuums or pumps to prevent mold growth.
- Thoroughly dry affected areas with fans and dehumidifiers to lower humidity levels.
- Clean surfaces with a mixture of water and detergent, followed by EPA-registered disinfectants to eliminate mold spores.
- Inspect and document all damage, focusing on hidden areas like inside walls and HVAC systems.
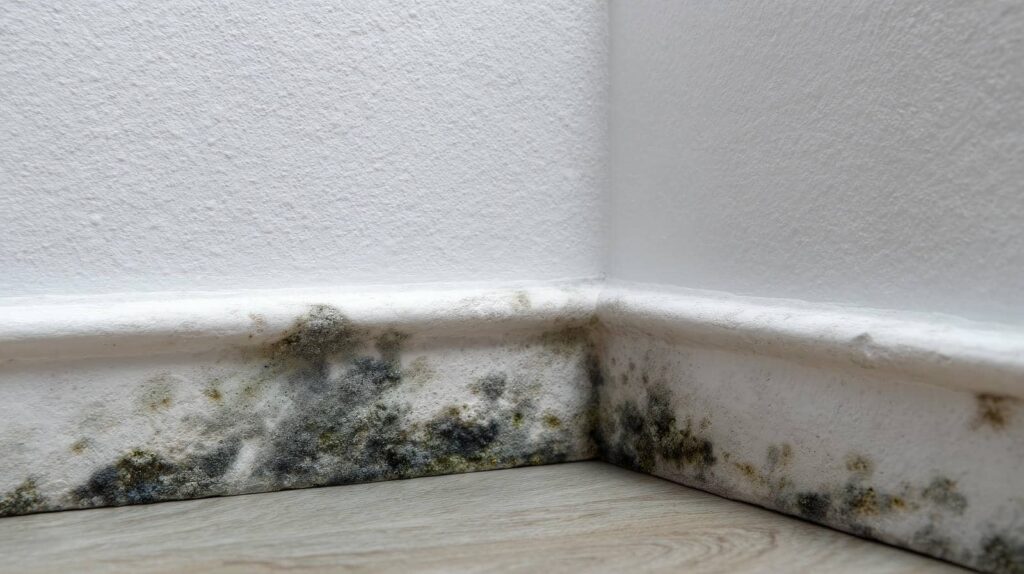
- Consult professionals if mold covers more than 10 square feet or if persistent odors or health issues arise.
Assess the Extent of Water Damage
Before you start any mold remediation process, it’s vital to assess the extent of water damage in your space.
Begin with a thorough water damage assessment to determine affected areas. Use damage evaluation techniques like moisture meters or thermal imaging to identify hidden moisture behind walls or under flooring. Check for discoloration, warping, or musty odors, as these often indicate water intrusion.
Document your findings meticulously, noting the severity and location of damage. This data will guide your remediation strategy and help you communicate effectively with professionals, if needed.
Prioritize areas that show significant damage, as they’re more prone to mold growth. Remember, addressing the root cause of water damage is essential to preventing future issues.
Prioritize Safety Precautions
After evaluating the extent of water damage, you must prioritize safety precautions to protect yourself and others during the mold remediation process.
Start by wearing appropriate personal protective equipment (PPE), including gloves, goggles, and N95 respirators, to minimize exposure to mold spores and other contaminants.
Implement preventative measures by sealing off the affected area with plastic sheeting to prevent mold from spreading.
Ensure proper ventilation in your workspace to reduce health risks associated with inhaling mold spores.
If you or anyone in your vicinity has respiratory issues, it’s best to keep them away from the remediation area entirely.
Be cautious with electrical appliances and outlets near water-damaged areas to avoid shock hazards.
Remove Standing Water Promptly
When you encounter standing water, act quickly to remove it to prevent mold growth.
Always prioritize safety by wearing protective gear, including gloves and masks.
Use appropriate equipment, such as wet vacuums or pumps, to ensure effective removal and minimize exposure.
Safety First
To ensure a safe environment during mold remediation, it’s crucial to address standing water immediately. This proactive step prevents mold growth and enhances your emergency preparedness.
Before you begin, verify you’re wearing personal protective equipment (PPE) to shield yourself from contaminants.
Here are some important actions to take:
- Use pumps or wet vacuums to remove water.
- Dry affected areas using fans and dehumidifiers.
- Check for hidden pockets of moisture in walls and floors.
- Dispose of contaminated materials safely.
- Monitor humidity levels to prevent regrowth.
Use Proper Equipment
Using the right equipment is essential for effective mold remediation, especially when it comes to removing standing water promptly.
Invest in industrial-grade water pumps and wet vacuums to ensure swift extraction and minimize moisture that can foster mold growth. Regular equipment maintenance is vital; check hoses, filters, and seals for peak performance before starting your remediation efforts.
Once the water is removed, conduct thorough mold testing to identify any hidden spores. This proactive step allows you to tackle mold issues effectively, fostering a healthier environment for you and your community.
Dry Out Affected Areas Thoroughly
Thoroughly drying out affected areas is essential for effective mold remediation, as lingering moisture can lead to further growth and health risks.
To ensure proper ventilation and utilize effective drying techniques, follow these steps:
- Open windows and doors to promote air circulation.
- Use fans to facilitate airflow and expedite drying.
- Deploy dehumidifiers to extract moisture from the air.
- Remove carpets, rugs, and padding that retain water.
- Inspect and dry walls, ceilings, and any other porous materials.
Identify and Remove Contaminated Materials
After drying out the affected areas, the next step involves identifying and removing contaminated materials. Start by using mold identification techniques to assess which items are irreparably damaged. Look for porous materials such as drywall, carpets, and insulation, as these can harbor mold even after drying.
If you spot visible mold growth or smell musty odors, it’s a clear sign that removal is necessary.
For contaminated material disposal, wear protective gear, including gloves and masks, to avoid inhaling spores. Seal contaminated items in plastic bags before disposal to prevent further contamination of your home.
It’s essential to follow local regulations regarding waste disposal, especially for hazardous materials. By taking these steps, you protect your living space and contribute to a healthier environment for you and your family.
Use Dehumidifiers to Control Humidity
Controlling humidity is essential for preventing mold growth, and dehumidifiers are an effective tool in this battle. By maintaining ideal humidity levels, you can considerably reduce the risk of mold resurgence.
Here’s how to maximize your dehumidifier’s effectiveness:
Set the dehumidifier settings to maintain humidity levels between 30-60%.
Position the unit in the most affected areas to enhance air circulation.
Empty the water reservoir regularly to ensure consistent performance.
Monitor humidity levels with a hygrometer to track progress.
Run the dehumidifier continuously in damp conditions for quicker results.
Clean and Disinfect Surfaces
Since mold spores can easily settle on various surfaces, it’s essential to clean and disinfect these areas regularly to prevent mold growth.
Start with surface cleaning, focusing on high-touch areas like countertops, doorknobs, and light switches. Use a mixture of water and detergent for initial cleaning to remove dirt and debris.
Next, choose appropriate disinfectant types. Look for EPA-registered products specifically designed to combat mold and mildew. Bleach solutions can be effective, but make sure you follow safety guidelines and ventilate the area properly.
For porous surfaces, consider using a specialized mold disinfectant that penetrates deeper.
After applying the disinfectant, allow it to sit for the recommended time to ensure effectiveness. Rinse surfaces with clean water if necessary, and dry thoroughly to discourage future mold growth.
Regularly maintaining cleanliness and using the right disinfectants fosters a healthier environment for you and your loved ones.
Apply Mold Inhibitors
Applying mold inhibitors is essential for preventing future growth after you’ve cleaned and disinfected surfaces.
You’ll find various types of mold inhibitors, each with specific application techniques and safety precautions to follow.
Understanding these factors will help you effectively protect your environment from mold recurrence.
Types of Mold Inhibitors
When you tackle mold issues, understanding the different types of mold inhibitors can greatly enhance your remediation efforts.
You’ll find that both natural and chemical mold inhibitors can be effective in preventing further growth. Here’s a breakdown of common options:
Vinegar: A natural solution that disrupts mold growth without harsh chemicals.
Baking Soda: Absorbs moisture and neutralizes odors, making it a great mold deterrent.
Hydrogen Peroxide: A chemical mold inhibitor that effectively kills mold spores on various surfaces.
Essential Oils: Tea tree oil and lavender oil act as natural mold inhibitors with pleasant fragrances.
Commercial Mold Inhibitors: Formulated products designed to target specific mold types and prevent regrowth.
Choose the right inhibitors for your situation to achieve the best results.
Application Techniques
Understanding the right application techniques for mold inhibitors can considerably improve their effectiveness.
Start by selecting appropriate application methods, which may include spraying, brushing, or rolling, depending on the surface treatment required. For porous materials, such as wood or drywall, ensure thorough saturation to penetrate deeply.
Non-porous surfaces, such as tiles or glass, benefit from even coats to create a protective barrier. Always follow manufacturer instructions for dilution and application timing to optimize results.
After applying mold inhibitors, allow adequate drying time before reintroducing moisture or covering surfaces.
Safety Precautions
Before applying mold inhibitors, it’s vital to prioritize safety precautions to protect yourself and others in the vicinity.
Implementing proper personal protective equipment (PPE) is important. Here are some key safety measures to follow:
- Wear a N95 respirator to filter out mold spores.
- Use gloves to prevent skin contact with mold and chemicals.
- Don protective eyewear to shield your eyes from irritants.
- Ensure proper ventilation in the workspace to minimize inhalation risks.
- Keep emergency procedures in mind, including knowing the location of first aid kits and how to contact emergency services.
Monitor for Mold Growth
To effectively manage mold growth in your home, regular monitoring is essential. Start by conducting routine mold detection checks in areas prone to moisture, such as basements, bathrooms, and under sinks. Use a moisture meter to identify damp spots, as these can indicate potential mold growth. Keep an eye on any visible signs, like discoloration or a musty odor, which often signal mold presence.
Implement growth monitoring practices by inspecting your home weekly, especially after heavy rain or flooding. Document any changes you notice, as this can provide valuable information for your remediation efforts.
Ascertain proper ventilation in your home to reduce humidity, which can help prevent mold from establishing itself. If you notice any alarming signs, don’t hesitate to take action.
Consult Professionals for Severe Cases
How do you know when it’s time to call in the experts for mold issues? If you face extensive mold growth or health concerns, it’s vital to seek professional help.
Here’s when you should consider mold inspection services and professional remediation:
- You notice mold covering more than 10 square feet.
- You smell a persistent, musty odor that doesn’t dissipate.
- You experience allergic reactions or health problems linked to mold exposure.
- You find mold in hidden areas, like inside walls or HVAC systems.
- You’ve had previous flooding or water damage that hasn’t been fully addressed.
Taking these signs seriously can protect your home and health.
Professionals have the tools and expertise to handle severe mold infestations safely and effectively.
Don’t hesitate to reach out; working together ensures a safe environment for you and your loved ones.
Frequently Asked Questions
How Long Does It Take for Mold to Grow After Flooding?
Mold can sprout within 24 to 48 hours after flooding, given the right conditions. Understanding the mold growth timeline is essential, as flood damage effects can escalate rapidly if not addressed promptly. Don’t wait!
Can I Remove Mold Myself, or Should I Hire a Professional?
You can remove mold yourself using DIY mold solutions, but hiring a professional is often safer. They’ve got advanced mold removal techniques and can ensure thorough remediation, reducing the risk of health issues and future growth.
What Health Risks Are Associated With Mold Exposure?
Mold exposure can lead to various health risks, including respiratory issues, allergic reactions, and skin irritations. Recognizing mold symptoms early is vital for mold prevention, ensuring you maintain a healthy living environment for everyone.
Will Insurance Cover Mold Remediation Costs After Flooding?
Insurance often covers mold remediation costs after flooding, but it varies by policy. Check your mold insurance for specific remediation coverage details. You’ll feel a sense of security knowing you’re protected from unexpected expenses.
How Can I Prevent Mold From Returning After Remediation?
To prevent mold from returning after remediation, implement preventative measures like maintaining humidity control below 60%. Use dehumidifiers, ensure proper ventilation, and address leaks immediately to create a mold-resistant environment in your home.
Recent Posts
3 Best Mold Remediation Strategies After Flood Damage
After flood damage, addressing mold growth is essential for your health and property. You need
Effective Mold Remediation After Flood Damage
Have you ever wondered just how quickly mold can take hold after a flood? The
Essential Steps for Sewage Spill Cleanup
When faced with a sewage spill, can you afford to overlook the essential steps for