Contents
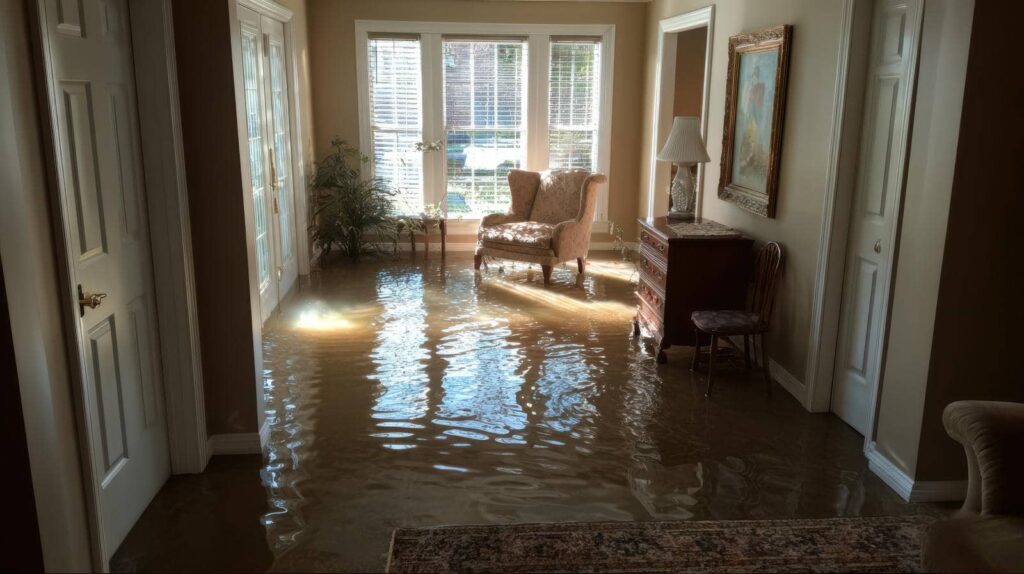
Mold can invade your home faster than a wildfire, especially after flooding. It’s vital to tackle this issue head-on to protect your health and property. You need to assess the extent of the mold growth, ensure safety, and contain the area effectively. But what specific mold removal techniques will ensure you eliminate mold completely and prevent its return? Understanding these steps can make all the difference in safeguarding your environment.
Key Takeaways
- Assess the affected area for mold growth by checking for discoloration, musty smells, and high humidity levels above 60%.
- Contain the space by sealing off doors and windows, using plastic sheeting, and turning off HVAC systems to prevent spore spread.
- Remove contaminated materials like drywall and carpeting, and dispose of them safely using heavy-duty trash bags.
- Clean surfaces with soap and water, then apply disinfectants like bleach or hydrogen peroxide to eliminate mold spores.
- Monitor humidity levels and ensure proper ventilation to prevent future mold growth; consider using dehumidifiers and exhaust fans.
Assessing the Extent of Mold Growth
How can you effectively assess the extent of mold growth after a flood? Start by identifying different mold types, as they thrive under varying growth conditions.
Use your senses; look for discoloration on walls and ceilings, and smell mustiness in the air. These initial signs can guide your investigation.
Next, check areas with high moisture exposure, like basements or behind appliances, where mold is likely to flourish.
Measure humidity levels; if they’re above 60%, mold growth is probable.
Document your findings, noting locations and the severity of growth. This precise assessment will aid in determining the necessary remediation steps.
Ensuring Safety and Protection
While evaluating mold growth is essential, ensuring your safety and protection during the remediation process is equally important.
Mold health can greatly impact your well-being, so you must take precautions. Start by equipping yourself with proper safety equipment. This includes N95 respirators to prevent inhalation of spores, gloves to protect your skin, and goggles to shield your eyes from irritants.
Before beginning any work, assess the environment carefully. Confirm adequate ventilation by opening windows and using fans to reduce spore concentration. If the mold covers a large area or if you have underlying health conditions, consider hiring professionals. They’re trained to handle hazardous situations safely.
Always be aware of your limits. If at any point you feel overwhelmed or unsafe, it’s important to step back. Prioritizing your health during mold removal protects you and fosters a safer atmosphere for everyone involved.
Containing the Affected Area
To effectively contain the affected area, you need to seal off the space where mold has developed.
Using plastic barriers helps prevent spores from spreading to uncontaminated areas of your home.
This step is essential for minimizing exposure and ensuring a more efficient mold removal process.
Seal Off Affected Space
Before you begin the mold removal process, it’s essential to seal off the affected space to prevent spores from spreading to unaffected areas.
This step is vital for effective mold prevention and ensuring your home stays safe. You can achieve this by following these guidelines:
- Close all doors and windows to minimize airflow.
- Use plastic sheeting to cover vents and openings, ensuring space ventilation is controlled.
- Turn off the HVAC system to avoid circulating spores.
- Seal any gaps or cracks with tape or caulk.
Use Plastic Barriers
Using plastic barriers is a crucial step in containing the affected area during mold removal. By setting up these barriers, you effectively isolate the contaminated space, preventing spores from spreading to other parts of your home.
It’s important to use mold-resistant materials for the barriers, as this adds an extra layer of protection against future growth. Make sure the barriers are sealed tightly, minimizing gaps that allow air circulation, which could carry mold spores elsewhere.
You should also consider using a negative air machine to further control air quality. This approach not only helps in managing the current mold problem but fosters a safer environment for you and your loved ones, promoting a sense of community and well-being.
Removing Contaminated Materials
After flooding, it’s essential to identify materials that have been contaminated, as these can harbor mold growth and pose health risks.
You’ll need to implement safe disposal methods to ensure hazardous materials are removed without spreading contaminants.
Finally, consider effective replacement strategies for any materials that can’t be salvaged, ensuring your space is restored safely.
Identify Affected Materials
Identifying affected materials is essential in the mold removal process following flooding. Effective mold identification techniques help you assess what’s salvageable and what needs to be removed.
Begin by conducting an affected material assessment to pinpoint contaminated items. Focus on:
- Drywall: Often absorbs moisture, making it a prime candidate for mold growth.
- Carpeting: Can trap water and dirt, fostering a mold-friendly environment.
- Insulation: If wet, it’s usually beyond saving and must be discarded.
- Wood: Check for warping or discoloration, which can indicate mold presence.
Safe Disposal Methods
Once you’ve identified the contaminated materials, it’s vital to dispose of them safely to prevent further mold growth and health risks.
Begin by segregating these items, as some may be recyclable while others are considered hazardous waste. For instance, items like drywall, carpets, and insulation often need to be discarded entirely due to mold saturation.
Check local guidelines for recycling options, as some communities may offer specific programs for dealing with contaminated materials.
When disposing of hazardous waste, make certain you’re following regulations to protect both your health and the environment.
Use heavy-duty trash bags for containment and label them clearly.
Replacement Strategies
Removing contaminated materials is a critical step in your mold remediation process.
To effectively tackle this challenge, you’ll want to focus on specific areas that require replacement materials.
Consider these key points:
- Identify and remove drywall, insulation, or carpeting that’s been affected.
- Utilize high-quality replacement materials that are mold-resistant.
- Ensure proper disposal methods to prevent further contamination.
- Check your insurance coverage to see if it includes the costs for replacement materials.
Cleaning and Disinfecting Surfaces
As you tackle the aftermath of flooding, cleaning and disinfecting surfaces is crucial to prevent mold growth and ensure a safe environment.
Begin by removing any debris and standing water, as these can harbor contaminants. Use effective cleaning techniques such as scrubbing surfaces with a mixture of water and soap to eliminate dirt and grime.
Next, choose appropriate disinfecting agents like bleach or hydrogen peroxide, ensuring you follow manufacturer instructions for dilution and application. Focus on high-touch areas, such as countertops and door handles, where bacteria can thrive.
Remember to wear protective gear, including gloves and masks, to safeguard your health during this process.
After cleaning, allow surfaces to dry thoroughly to minimize moisture, which is essential in mold prevention.
Drying and Dehumidifying the Space
To effectively prevent mold growth after flooding, drying and dehumidifying the space must be prioritized immediately. Mold spores thrive in damp environments, so employing proper drying techniques is essential.
Start by ensuring good airflow and using dehumidifiers to reduce moisture levels. Here are some effective methods to take into account:
- Open windows and doors to promote ventilation.
- Use fans to circulate air, speeding up the drying process.
- Place dehumidifiers in affected areas to extract excess moisture.
- Remove soaked materials like carpets and drywall to facilitate thorough drying.
Utilizing Mold Removal Products
Mold removal products play a crucial role in effectively combating the growth of mold after flooding. When selecting these products, you’ll want to take into account their specific formulations and product effectiveness.
For instance, bleach can kill surface mold, but it doesn’t penetrate porous materials like wood or drywall, which may harbor spores. Alternatively, products containing hydrogen peroxide or vinegar can be more effective for deeper penetration.
Before applying any mold removal product, make certain you’re wearing protective gear to safeguard your health. Always follow the manufacturer’s instructions for best results, as improper use can diminish product effectiveness.
Additionally, you may want to invest in preventive sprays that inhibit mold growth in the future.
Preventing Future Mold Growth
Although flooding can create a conducive environment for mold growth, you can take proactive steps to minimize the risk of future infestations.
Implementing effective strategies is essential for maintaining a healthy living space.
- Use mold-resistant materials in your home, especially in areas prone to moisture.
- Control humidity levels by using dehumidifiers and proper ventilation systems.
- Regularly inspect and maintain plumbing to prevent leaks that can lead to mold.
- Educate yourself about mold prevention methods to foster a community of awareness.
Frequently Asked Questions
How Long Does It Take for Mold to Start Growing After Flooding?
After flooding, you’ll typically see mold growth within 24 to 48 hours, depending on flood damage factors like humidity and temperature. Understanding the mold growth timeline helps you respond quickly and effectively to prevent further issues.
Can I Remove Mold Myself, or Should I Hire Professionals?
You might think you’re a mold-fighting superhero with DIY methods, but if the infestation’s epic, hiring professional services could save your sanity. Weigh your options carefully; health and safety should always come first.
What Are the Health Risks Associated With Mold Exposure?
Mold exposure can trigger mold allergies and respiratory issues, leading to symptoms like sneezing, coughing, and difficulty breathing. It’s vital you address mold problems promptly to protect your health and maintain a safe living environment.
Are There Natural Remedies for Mold Removal?
When it comes to mold removal, natural solutions often shine like diamonds. You can create effective homemade cleaners using vinegar or baking soda, which eliminate mold and promote a healthier living environment.
Will Insurance Cover Mold Removal Costs After Flooding?
You should review your insurance policies to determine if they cover mold removal costs after flooding. Be aware of coverage limits, as they can greatly impact your financial responsibility regarding mold remediation expenses.
Conclusion
In the battle against mold after flooding, you’ve got the tools to reclaim your space. By evaluating damage, containing the area, and meticulously cleaning, you’re not just removing mold; you’re erasing its footprint. Drying and dehumidifying prevent its return, like sealing a door against unwelcome guests. With vigilance and the right products, you’ll transform a damp disaster into a safe haven. Embrace these techniques, and you’ll turn the tide in your fight against mold, ensuring your home remains a fortress of health.
Recent Posts
10 Tips for Mold Remediation After Flooding
Flooding can lead to rapid mold growth, which poses serious health risks and damages your
3 Best Mold Remediation Strategies After Flood Damage
After flood damage, addressing mold growth is essential for your health and property. You need
Effective Mold Remediation After Flood Damage
Have you ever wondered just how quickly mold can take hold after a flood? The